Contents
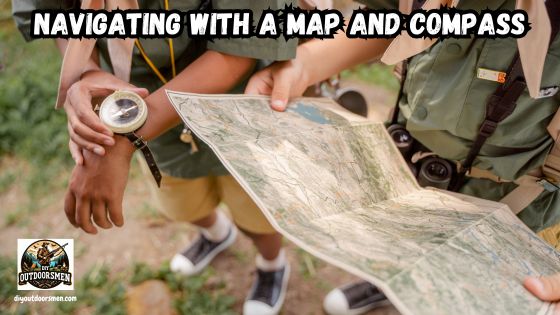
Using a map and compass is a vital skill for anyone enjoying the outdoors. In this guide, I explain basic techniques to read maps, use a compass, and keep your course when exploring unfamiliar areas. Learning these steps not only builds your confidence but also ensures you can navigate when technology isn’t available.
- Understanding Your Tools: A map displays land features such as trails, water bodies, and variations in the terrain using clear symbols and a defined scale. The compass, though small, is extremely reliable and points toward magnetic north with its magnetized needle and degree markings..
- Orienting Your Map: Start by finding identifiable landmarks in your surroundings, such as streams, roads, or open clearings, and compare these with the features shown on your map. Rotate the map until the top (north) aligns with the direction indicated by your compass.
- Taking a Bearing: Begin by clearly identifying your desired destination on the map. Then, imagine or lightly mark a straight line between your current location and that destination. Hold your compass along this line so that the travel arrow follows it exactly, remembering to keep the instrument level. The degree shown by the needle is your bearing, telling you precisely which direction to travel.
- Following Your Bearing: Keep the compass flat and periodically recheck its reading as you proceed. Turn your body until the needle lines up exactly with the north indicator to confirm that you are on the right course. Pause every now and then to ensure that natural features continue to match those on your map.
- Practicing: Practice is really important when it comes to using a map and compass effectively. Regular practice in settings with clear landmarks—such as a park or open field—can help you build your skills gradually.
- Safety Considerations: Always be prepared for unexpected shifts in weather or the terrain. If you run into obstacles like steep slopes or dense vegetation, be ready to adjust your planned route accordingly. Always inform someone about your route and your expected return time, and carry essential supplies like water, food, and a basic first aid kit.
Whether you are planning a short hike or a longer trip, these concise instructions cover the essentials of navigation—from understanding your gear to confirming your direction in the field. Before setting out, take a few moments to review the basics.
Getting comfortable with your tools will help you make smarter decisions once you’re on the move. The following sections break down each step to help you achieve a reliable sense of direction in any setting.
Step 1: Understanding Your Tools
The first step is to get to know the essential tools you will rely on. A map displays land features such as trails, water bodies, and variations in the terrain using clear symbols and a defined scale. By spending time with the map legend and studying contour lines, you can figure out distances and recognize natural markers that will guide your route.
The compass, though small, is extremely reliable and points toward magnetic north with its magnetized needle and degree markings. It is important to practice holding the compass flat so that the needle moves freely and provides accurate readings.
Familiarizing yourself with key terms like bearing—the precise direction in degrees—and declination—the gap between true north and magnetic north—lays a strong foundation and makes a big difference before you step into unknown terrain.
Step 2: Orienting Your Map
Once you are familiar with your tools, the next goal is to align your map with the real world. Start by finding identifiable landmarks in your surroundings, such as streams, roads, or open clearings, and compare these with the features shown on your map.
Rotate the map until the top (north) aligns with the direction indicated by your compass. This adjustment makes it far easier to compare the map with the landscape and understand your position.
Always account for any declination differences in your area by making small adjustments. Rechecking the alignment periodically ensures that your map remains an accurate reflection of your surroundings.
Step 3: Taking a Bearing
After your map is properly aligned, the next important task is to take a bearing. Begin by clearly identifying your desired destination on the map. Then, imagine or lightly mark a straight line between your current location and that destination.
Hold your compass along this line so that the travel arrow follows it exactly, remembering to keep the instrument level. The degree shown by the needle is your bearing, telling you precisely which direction to travel. Having a clear bearing is essential because it allows you to quickly reorient yourself if you lose track or if unexpected obstacles force you to adjust your path.
Step 4: Following Your Bearing
With a clear bearing in hand, start moving in the direction indicated by your compass. Keep the compass flat and periodically recheck its reading as you proceed. Turn your body until the needle lines up exactly with the north indicator to confirm that you are on the right course.
As you move forward, pause every now and then to ensure that natural features continue to match those on your map. This regular check helps you correct any slight deviations that may occur, keeping you confident in your navigation even as the terrain changes.
Step 5: Practicing and Refining Your Skills
Practice is really important when it comes to using a map and compass effectively. Regular practice in settings with clear landmarks—such as a park or open field—can help you build your skills gradually.
Once you are comfortable in familiar areas, try applying your newfound skills in more challenging environments. Look for noticeable natural markers like large boulders or distinct trees to verify your location along the route.
Over time, these techniques become almost automatic, and even short excursions can reinforce your ability to navigate confidently on your own. Enjoy every practice session and let each outing add to your growing expertise.
Safety is very important when following your bearings in the field. Always be prepared for unexpected shifts in weather or the terrain. If you run into obstacles like steep slopes or dense vegetation, be ready to adjust your planned route accordingly.
It helps to take multiple bearings along your journey to confirm that you are staying on track. Always inform someone about your route and your expected return time, and carry essential supplies like water, food, and a basic first aid kit. These extra steps ensure that your outdoor experience remains both enjoyable and secure.
Common Questions and Troubleshooting
If you ever lose your bearings, take a moment to pause and reorient yourself by checking your map and matching visible landmarks. When dealing with declination, first determine the local adjustment by researching the difference between true north and magnetic north, then apply that correction to your compass reading.
If you’re not completely confident with your compass yet, start navigating in open areas with familiar markers and gradually try more challenging routes as your confidence builds. Regular practice in low-risk environments is a simple way to develop your skills and keep any navigation errors to a minimum.
Final Thoughts and Next Steps
Using a map and compass is a skill that develops with careful practice and real-life use. These tools are more than just methods to follow a route—they empower you to take charge of your travel in any setting.
With the knowledge and experience you gain, even shorter trips can serve as valuable lessons in navigation. The bottom line is that a bit of preparation and steady practice can transform your outdoor adventures into safe and empowering experiences. Take these steps today and enjoy the freedom of exploring with confidence.
Most Recent Articles:
- Garmin GPS Devices: Navigational Must-Haves For DIY Hunting Expeditions
- Best Rooftop Tents For Overlanding

- Overlanding The Infamous Black Bear Pass In Colorado
- How To Pack A Lightweight Backpack For DIY Backpack Hunting Trips
- Navigating The Hunt Application Process In The US

- Kodiak Canvas Cabin Lodge Tent
As always, stay safe, enjoy the journey, and please try to leave it cleaner than you found it. If you have any comments, questions, ideas, or suggestions, please leave them in the comment section below, and I’ll get back to you ASAP. You can follow us on YouTube: Man Art Creations for videos of our DIY Adventures.
P.S. Thanks so much for checking out our blog; we really appreciate it. Just so you know, we may receive a commission if you click on some of the links that appear on our site. This helps us keep our content free and up-to-date for everyone. We appreciate your support!

