
Contents
- 1 Understand the Purpose and Responsibility of Trophy Photos
- 2 Preparation: Essential Gear and Pre-Shot Steps
- 3 Composing an Appealing and Respectful Trophy Photo
- 4 Lighting: Making the Most of Natural Conditions
- 5 Practice and Photo Tricks that Work in the Field
- 6 Editing and Sharing Trophy Shots Responsibly
- 7 Practical Tips and Common Questions
- 8 Real World Applications and Extra Considerations
- 9 Frequently Asked Questions About Trophy Photography
Taking a trophy photo after a hunt is about preserving a memory and showing ethical respect for the animal and the environment. I care about creating images that tell the full story while keeping everything dignified and tasteful. Here, I’ll give you my perspective and tips on photographing trophy shots in the field, including how I prepare, position myself and the animal, and use the tools available for the best results.
QUICK LOOK: Tips for Trophy Photography
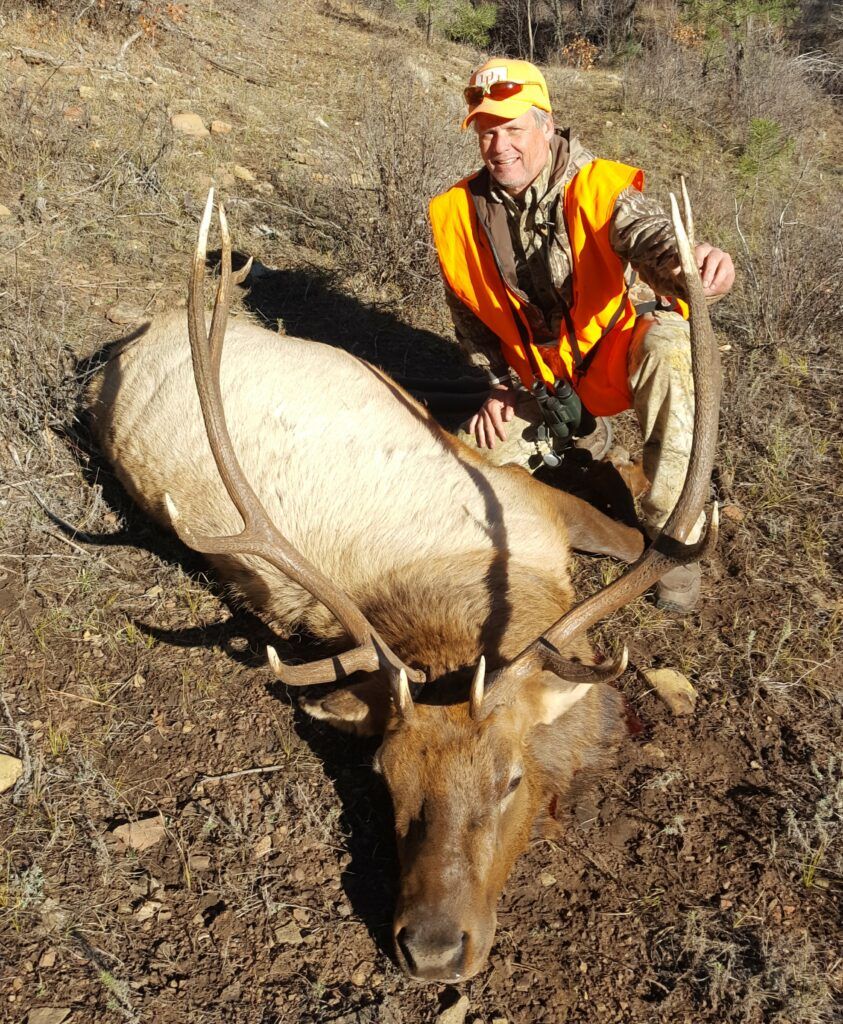
- Position yourself and the animal: I kneel or sit behind or beside the animal instead of in front. I never straddle, lie across, or sit on it. Keeping the animal’s posture neat with legs tucked and head propped up gives off a calm, “bedded” look.
- Consider imperfections: If there are wounds or spots that might come off as harsh, I use my position or adjust the angle to keep it respectful. Hands, gear, or some brush can gently cover small flaws if needed.
- Smile naturally: I make a point to smile genuinely in these photos. The excitement and gratitude from a successful hunt show best that way.
- Take extra photos: I snap more photos than I expect to need. Changing my position just a little or switching up the angle often turns a good shot into a great one.
- Check focus: I double-check that faces and the animal’s eyes (if open) are sharp. When someone else is behind the camera, I show them how to use “touch-to-focus” on smartphones—it’s a real help.
- Be patient: It’s easy to rush when daylight is running out, but those extra couple of minutes often pay off in a much better picture.
- Framing and Rule of Thirds: I like to frame the animal and myself off-center using the rule of thirds. On most cameras and smartphones, grid lines make this simpler.
- Bring extra batteries and memory cards: Cold can zap batteries, and lots of photos fill memory quickly.
- Keep a lens cloth handy: Dirt, dust, and weather can mess with shots, so a quick wipe is often needed.
- Plan for group shots: A small tripod and the self-timer let me jump into the photo without hassle.
- Protect against weather: Packing a plastic bag or slip-on cover for the camera is a smart backup plan.
Understand the Purpose and Responsibility of Trophy Photos
Trophy photos hold a special place for hunters. They help me remember the day’s work, the challenge, and sometimes even the whole trip. I’m aware these images are sometimes seen by people who do not understand the reasons behind hunting. Taking the time to make respectful, well-composed pictures is very important for representing myself and the traditions I respect.
My focus is to show respect for the animal and the landscape, not simply to highlight the trophy. By cleaning up the scene, presenting the animal thoughtfully, and keeping the overall image positive, I reflect ethical practices in hunting.
Preparation: Essential Gear and Pre-Shot Steps
Having the right gear makes a noticeable impact in field photography. My kit includes a digital camera or smartphone with a solid camera, extra batteries, a microfiber cloth, and at times a compact tripod. For rugged or remote locations, I bring a waterproof camera bag and even a small reflector for tricky lighting situations.
Before taking any photos, I check my camera settings, carefully clean any blood or debris from the animal, and tidy myself up as well. If I’m hunting with a partner, I’ll ask them to do the same. Wipes, tissues, and a water bottle from my field dressing kit are handy for a quick clean-up.
I tuck the animal’s legs under its body and settle it on natural terrain, aiming for a peaceful, undisturbed look. These small touches are worth the extra few minutes they take, and every photo looks better for it. I also make certain to pick up any gear, shell casings, or trash in the background. Little details like this can easily distract from the main focus of the image.
Composing an Appealing and Respectful Trophy Photo
Composition is the bedrock of every shot I take in the field. I pick a background that sets the outdoor scene—open fields, mountain backdrops, or forest edges all work well. I stay clear of roads, camp gear, or vehicles unless they really support the story. My goal is a backdrop that shows off the setting without pulling attention from the animal.
- Position yourself and the animal: I kneel or sit behind or beside the animal instead of in front. I never straddle, lie across, or sit on it. Keeping the animal’s posture neat with legs tucked and head propped up gives off a calm, “bedded” look.
- Consider imperfections: If there are wounds or spots that might come off as harsh, I use my position or adjust the angle to keep it respectful. Hands, gear, or some brush can gently cover small flaws if needed.
- Smile naturally: I make a point to smile genuinely in these photos. The excitement and gratitude from a successful hunt show best that way.
When antlers or horns are in play, I usually shoot from a lower angle (even with the animal’s body or slightly lower) so they stand out against the sky. This adds emphasis and makes the photo pop. Taking the shot from too high up flattens the image and makes it look less lively. If someone else is working the camera, I remind them of this. Weapons, when included, are always unloaded, pointed safely, and never set on the animal or aimed at anyone in the shot.
Lighting: Making the Most of Natural Conditions
Natural light can go a long way in outdoor photography. Early morning or late afternoon, known as the “golden hour,” creates soft light and warm tones. Shooting in the harsh light of midday can mean strong shadows, so I find some shade, use a fill flash, or adjust my camera’s exposure.
I pay attention to where the sun is—too much behind my subject causes silhouettes, while sunlight straight in front can mean squinting and washed-out colors. Cloud cover gives nice, even lighting, but I check my photos for enough contrast.
A small fill flash comes in handy to brighten faces and dark spots. If my camera has an HDR mode, I turn it on for balanced exposure. Sometimes, just tilting the camera or changing the animal’s angle transforms the whole scene under tough lighting.
Practice and Photo Tricks that Work in the Field
Getting to know my camera’s ins and outs before hunting season pays off when things get busy outside. I put time in during the offseason, taking pictures of all sorts of things—my dog, family, backyard scenes—to make sure I’m quick and at ease when I only get one shot.
- Take extra photos: I snap more photos than I expect to need. Changing my position just a little or switching up the angle often turns a good shot into a great one.
- Check focus: I double-check that faces and the animal’s eyes (if open) are sharp. When someone else is behind the camera, I show them how to use “touch-to-focus” on smartphones—it’s a real help.
- Be patient: It’s easy to rush when daylight is running out, but those extra couple of minutes often pay off in a much better picture.
- Framing and Rule of Thirds: I like to frame the animal and myself off-center using the rule of thirds. On most cameras and smartphones, grid lines make this simpler.
I always check the photo right after taking it to see if I need to try again. A breeze, a blink, or a shift can spoil an otherwise solid shot. Backup photos save the memory.
Editing and Sharing Trophy Shots Responsibly
At home, I always review my shots before sharing. Light edits—cropping, tweaking brightness or contrast, or bringing down sharp shadows—are all right, but I avoid filters or heavy edits that turn the scene into something unreal. I want my trophy photos to look natural and true to the moment.
I also choose what I share thoughtfully. Not everyone sees hunting the same way I do, so I add a short story or a caption to give the photo some background and context. Describing how the hunt went or sharing what the day meant helps people connect with the image.
Practical Tips and Common Questions
After years of practice, a few lessons help everything go more smoothly:
- Bring extra batteries and memory cards: Cold can zap batteries, and lots of photos fill memory quickly.
- Keep a lens cloth handy: Dirt, dust, and weather can mess with shots, so a quick wipe is often needed.
- Plan for group shots: A small tripod and the self-timer let me jump into the photo without hassle.
- Protect against weather: Packing a plastic bag or slip-on cover for the camera is a smart backup plan.
The questions I get usually center on gear and how to keep photos looking natural. I always say to use what you have; modern smartphones are up to the task. Thoughtful setup matters more than expensive equipment. A real, comfortable smile does as much for a trophy photo as fancy hardware ever could.
Real World Applications and Extra Considerations
Great trophy shots go past showcasing the animal—they also capture the spirit of the hunt. My friends and I, while looking back at photos, trade stories about the hunt, the landscape, the surprises, and even little slip-ups. The memory is in the details.
- Show the environment: Framing distant peaks, tree lines, or scenic elements gives life to the story.
- Add personality: Including personal touches—a favorite cap, old license, or my trusted boots—often makes the image more memorable.
- Express gratitude: Whether it’s a thankful smile, a gentle gesture to the animal, or a sincere caption, gratitude should show.
Taking the time after a hunt to make lasting and respectful images always feels worthwhile. The photos do not just capture a moment for me but offer a reminder to others that hunters value ethical, careful practices outdoors.
Frequently Asked Questions About Trophy Photography
What is the best camera for field trophy photos?
Use the camera you’re most comfortable with. Modern smartphones can give you excellent results out in the field, but a DSLR or mirrorless camera offers more control. What matters most is holding steady, keeping the lens clean, and paying careful attention to lighting and background.
How should I respectfully pose with the animal?
Sit or kneel beside or behind the animal. Don’t sit or stand directly on it, and work to keep the animal looking as natural as possible. Fix the fur or feathers and position antlers or horns thoughtfully. Showing genuine emotion—like a smile—helps the photo feel sincere and respectful.
Can I edit trophy photos before sharing?
Light editing, like cropping and adjusting brightness, is fine. Heavy filters or strong edits make the pictures less real. Keep your changes subtle, so the image reflects your real experience and memory.
Most Recent Articles:
- DIY Weekend Warrior Hunting Trips

- Leupold’s Precision Scopes: Elevating DIY Hunting Accuracy

- Without a GPS Signal How do You Navigate Backcountry Trails?

- Vortex Optics Essentials: Hunting Scope Guide For The Serious Outdoorsman

- Garmin GPS Devices: Navigational Must-Haves For DIY Hunting Expeditions

- Best Rooftop Tents For Overlanding

As always, stay safe, enjoy the journey, and please try to leave it cleaner than you found it. If you have any comments, questions, ideas, or suggestions, please leave them in the comment section below, and I’ll get back to you ASAP. You can follow us on YouTube: Man Art Creations for videos of our DIY Adventures.
P.S. Thanks so much for checking out our blog; we really appreciate it. Just so you know, we may receive a commission if you click on some of the links that appear on our site. This helps us keep our content free and up-to-date for everyone. We appreciate your support!

