Contents
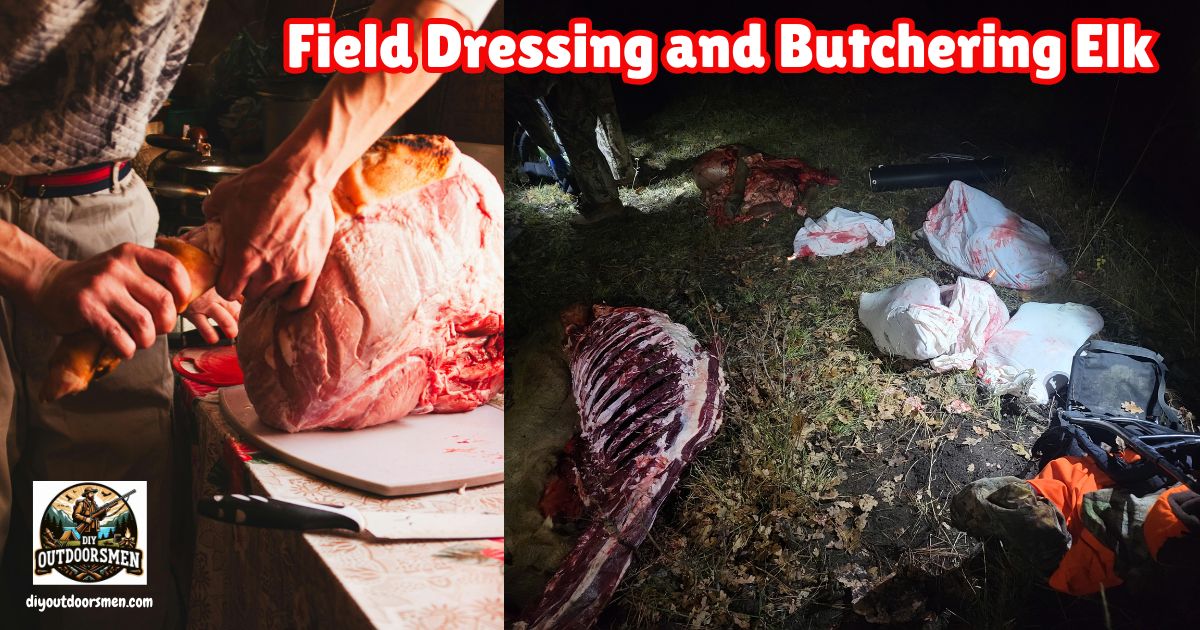
Successfully field dressing and butchering an elk in the field helps preserve meat quality and makes the packing job a lot easier. When I’m deep in the backcountry after a hard-won elk, being ready for this job with the right knowledge and gear really pays off. Understanding each step cuts down on wasted time and meat and keeps things safe and manageable.
Field dressing with the gutless method is what I use most. It avoids opening the body cavity completely, which keeps things cleaner, especially important with a large animal like an elk. In this step-by-step guide, I’ll break down the entire process based on my own experience and what’s worked best to get my elk meat cooled, cleaned, and ready to pack out.
Get Ready: Safety, Tagging, and Gear
The work starts before any knife comes out. I always double-check that the elk is truly expired from a distance. I approach from uphill and behind, keeping my firearm ready just in case, because safety can’t be stressed enough during these tense moments.
Tagging and Legal Requirements
- Attach your tag as required by your state. I keep the tag and a zip tie handy in my pack.
- Leave proof of sex (like a portion of the antler or sex organ) naturally attached to one main quarter, as most game laws require. I plan which quarter will carry the proof before making cuts.
Gather Essential Tools
- Sharp knives, spare blades, and preferably a blade change tool for safety
- Bone saw or compact pruning saw for joints (optional but handy)
- Heavy-duty nitrile gloves to keep my hands clean and safe
- Game bags, which need to be breathable, sturdy, and big enough for elk quarters
- Sturdy rope or paracord for anchoring elk legs out of the way
- A tarp for a makeshift clean surface if the ground is muddy or snowy
Smart Positioning
I roll the elk onto its side or back. Using rope or logs to splay out the legs really helps stabilize the carcass. Taking a minute here saves a lot of awkwardness later, especially if I’m working alone. Sometimes, when the terrain gets rough, it helps to look for natural features to anchor the animal or provide elevation for easier access.
Step-By-Step Gutless Field Dressing
The gutless method keeps things simple and avoids a big mess inside the body cavity. I always lay out my tools and game bags close by before starting.
Skinning the First Side
- Begin a cut from the anus (or genitals) up the centerline of the belly to the sternum.
- Keep the cut shallow to avoid puncturing the stomach.
- Extend cuts along the inside of the front and back legs to the knee joint on both legs of the side facing up.
- Peel the hide away from the meat by working slowly toward the spine. Rolling it skin side down nearby creates a clean spot for quarters.
Removing the Hindquarter
- Find the ball and socket joint at the pelvis (hip). This is the toughest spot.
- Cut deep muscles around the joint, then use my body to pull the leg away. Gentle twisting and upward pressure pops the joint free.
- Finish cutting connective tissue to remove the whole quarter. I get it straight into a game bag to keep dirt and hair away.
Removing the Front Quarter
- The front leg attaches only by muscle and tissue, with no real bone joint.
- Lift the front leg and trace the blade along the ribcage. The leg comes free with steady, smooth cuts.
- Bag each front quarter as soon as it’s off the carcass.
Taking Out the Backstrap
- Start with a shallow cut down the length of the back, right next to the spine, from behind the shoulder to just above the pelvis.
- Cut through the thin membrane until I reach the ribs.
- Use the tip of the knife to separate the backstrap from the vertebrae, working down to the ribs and lifting the backstrap out in one long piece. I always keep this cut as clean as possible, as the backstrap is one of the most prized pieces.
Accessing and Removing the Tenderloin
- Carefully cut through the abdominal muscles toward the pelvis, being careful not to puncture organs.
- The tenderloin lies inside close to the backbone, behind the last rib. I reach carefully under the spine and trim it free, using short, gentle cuts.
- If I keep the body cavity intact, the tenderloin comes out cleaner, but the opening is tight. If the elk has been dead a while or it’s hot, I may need to open the body cavity further for airflow and cooling.
Extra: Neck and Rib Meat
Neck meat can be tough, but I take as much as possible for burger or stew. Rib meat is thin but worth keeping for sausage. I use a small, sharp knife to peel these off in strips, bagging as I go. Sometimes, I stash wild onion or sage in the bag for a natural air freshener, especially on long hike outs.
Flip and Repeat
Once I get all the main cuts done on one side, I flip the carcass. Gravity makes this much easier with quarters already removed. I repeat the exact steps above to finish the other side, keeping everything as clean as I can. It’s always helpful to use natural slopes; if you work downhill, the process goes faster, and less meat gets in contact with dirt or leaves.
Meat Care and Cooling
Proper meat care is super important in warm weather. After all cuts are bagged, I spread them out or hang them on sturdy branches so air can circulate. I always use breathable bags, never plastic, because moisture trapped inside spoils meat quickly. Extra caution is needed if hunting early in the season—flies will find meat fast, so make use of black pepper or special meat bags to help keep them away.
Rapid Cooling and Transport
- My main goal is to get elk meat below 40°F as soon as possible. I use shady spots or creek banks if I can’t hike it out right away.
- If I’m hiking solo, I often haul out a heavy quarter first, return for the rest, or call someone for help. Slow hikes in with heavy packs are always harder when meat temperature rises, so I plan ahead with a solid game plan, especially during warm early-season hunts.
- I like to stash meat on north-facing slopes or even dig a shallow hole to keep bags cool and out of the sun until transport is ready.
Pack Cleanliness Tips
I double-check my bags for holes before the hunt and line my pack with a dedicated meat sheet. Snow works well as a natural cooler if available, but I never let meat get wet for long. Salt can help keep meat dry in a pinch and is worth keeping in your emergency kit.
Common Challenges and Extra Tips
Over the years, I’ve run into issues like steep slopes, thick brush, or an elk falling in a tough spot. Tying off the legs or quarters helps steady the carcass. If I can’t move the whole elk, I work carefully in place and keep an eye out for dirt or debris that could get into the meat.
When working alone in tricky spots, using trekking poles to prop up meat or block rolling quarters can really help, and having bright tape to mark your game bags ensures nothing gets left behind during dusk departures.
- Sharpening knives: I use a small field sharpener after every few cuts to keep things efficient and safe.
- Hair on meat: I carry a clean rag for brushing hair off, but I never use water from creeks unless it’s absolutely needed. Wet meat just doesn’t store as well.
- Carrying proof of sex: I always keep it naturally attached, even if I bone out meat, to avoid any legal trouble during transport or check-ins.
- Bug prevention: Cheesecloth or meat-specific bags help keep flies off; if it’s really bad, a mesh bug tent draped over meat caches works wonders.
Q&A: Practical Field Butchering Insights
What’s the fastest way to get meat cooled down?
Get the hide and large muscle groups separated quickly, then hang or lay the meat out in a way that exposes it to shade and breeze. Avoid stacking meat bags together for long periods. When possible, put bags up off the ground using rope slings or tree branches so air moves underneath as well.
Should I bone out quarters in the field?
If I have a long hike ahead, boning meat reduces weight, but it’s harder to keep things clean and organized. On short hikes or if there’s lots of help, I leave bones in the big quarters until I get to the cooler. In thickly wooded areas, boning out can actually make hauling easier, but it takes practice to keep pieces properly sorted.
How do I handle elk alone?
Solo hunters need patience and careful planning. I tackle each quarter one at a time, prop up the body safely with logs or rocks, and always go slow to avoid knife cuts or strained backs. Preplanning the hike out route is key—set waypoints on your GPS or mark trails with flagging tape to stay on track, especially if darkness is closing in.
Final Tips for a Successful Elk Butchering Experience
Good field preparation, the right gutless method steps, and paying attention to safety help me end hunts with high-quality, fresh elk meat every year. I always check local laws in advance, prep my game bags before I head out, and keep practicing to refine my technique. Learning from other hunters and exchanging tips at the trailhead are some of the best ways to pick up small tricks that make a big difference out in the field.
Your Elk Field Dressing Checklist:
- Pack sharp knives, gloves, rope, and quality game bags.
- Tag your animal immediately and prep for legal transport.
- Work methodically using the gutless method to avoid unnecessary mess.
- Keep meat off dirt, cool it fast, and transport it as soon as possible.
- Keep at least one energy snack in your field kit; a long butchering job takes calories and keeps your focus sharp.
I hope your next elk hunt brings home clean, great-tasting meat. If you have any tips or questions of your own, feel free to share them below. Each season in the field is a new chance to get better and keep the tradition alive for new hunters keen to learn the ropes.
Most Recent Articles:
- Garmin GPS Devices: Navigational Must-Haves For DIY Hunting Expeditions
- Best Rooftop Tents For Overlanding

- Overlanding The Infamous Black Bear Pass In Colorado

- How To Pack A Lightweight Backpack For DIY Backpack Hunting Trips
- Navigating The Hunt Application Process In The US

- Kodiak Canvas Cabin Lodge Tent
As always, stay safe, enjoy the journey, and please try to leave it cleaner than you found it. If you have any comments, questions, ideas, or suggestions, please leave them in the comment section below, and I’ll get back to you ASAP. You can follow us on YouTube: Man Art Creations for videos of our DIY Adventures.
P.S. Thanks so much for checking out our blog; we really appreciate it. Just so you know, we may receive a commission if you click on some of the links that appear on our site. This helps us keep our content free and up-to-date for everyone. We appreciate your support!

